First, a little history about LiteTouch
Founded in 1978, LiteTouch was a leader in the customized lighting control industry. They developed products for both residential and commercial properties. They were in a very small specialized market and their systems were costly compared to standard lighting installations. They did however offer the most futuristic options back in the day. These systems involved true automation by incorporating a central processor (CPU), a specialized wiring system, controllers, power supplies, enclosures, custom keypads, and programming. Pricing for these systems could range anywhere from $25,000 to hundreds of thousands depending upon the size of the system. They were scalable and could also be incorporated into properties with conventional lighting control as well. You could actually have a home or building in which some room’s deployed lighting control and others had the conventional light switch.
These components were the backbone of the LiteTouch system and required regular support and maintenance, like any electrical/mechanical system with current running through the components, things do happen. LiteTouch supported these systems by utilizing a network of independent trained integrators, designers, and electricians, who were trained to offer support, service/repairs, and programming for these systems. You could not buy LiteTouch on the open market through Big Box retailer or the local hardware store, you would need to work directly with an authorized electrician or integrator.
LiteTouch had some competition. Their major competitor at the time was Lutron, who actually had a majority of the market share. LiteTouch was more affordable and offered customization that Lutron, at the time would not.
Personally, I always considered LiteTouch to be more of a boutique offering for a customized lighting system. If we had a special request from a client, LiteTouch would be willing to entertain almost anything. I could place a call to the manufacturer and within days have pricing and a new SKU to order to solve my clients’ concerns. We could customize wall plates to look like wallpaper or any painted finish the customer could imagine.
There was a buzz over lighting control.
Lighting control offered several very impressive benefits to those that could afford the costly installations:
Pathway Lighting
You decide to get up at 1 AM, and press one button and certain lights throughout your home illuminate at very dim light, just enough for you to walk through the hallways, and automatically turn back off in 30 minutes.
Emergency Lighting
You could press an emergency button and all the exterior lights would come on and begin to flash while providing light for a majority of the interior rooms, surely your home would be easy to find for emergency responders.
Reduced Energy Costs
Dimming your lighting will save you $$ by using less energy.
Better for the environment
Using less energy is good for the environment.
Extends the life of the bulbs
The light bulbs themselves will last longer by reducing their daily consumption.
Preset scenes
Very easily configure certain keypad buttons, such as Night time, to have certain lights throughout the home, inside and out, come on for a set period of time, these are called scenes.
Ability to use schedules
By programming the system, lights can be set to come on and off at predetermined times.
Ability to trigger lighting to come on using inputs/relays etc
We have used this feature to control lights in a nature center, as you would walk by the exhibits the lights would come on and the exhibit would come to life.
Landscape Lighting functioning from an Astronomical clock
It’s nice to have your lights come on based upon when the sun sets and rises without adjusting a timer or using a photocell.
Daylight harvesting
Being able to use the light from outside to automatically adjust the lighting inside, is called harvesting. Sensors would be installed in rooms in which there is natural light to feed information into the lighting control system telling it to dim the lights when there is an abundant amount of natural light.
Increased comfort
When the systems are programmed properly, most owners are very satisfied with the ease of use and the benefits it contributes to easy living in their home or business.
Vacation Mode
One simple button to press when you leave for vacation. The lighting control system can actually remember which buttons and routines run throughout the week. Switching the system to vacation mode actually has the system turn lighting on at random times although somewhat on the regular schedule. In most conventional systems, the “timer” turns the lights on at 6 PM every night. With the Vacation mode, one night might be 5:50 PM, one night might be 6:20 PM, it gives the house a lived-in feel while you are on vacation.
“My favorite” Wall Acne reduced
Yes, homes can have wall acne. Picture walking into a friend’s home and stepping into their main living area and having never been in the new home, you go to turn on the lights, and realize there are 6 switches in a bank at the entry to the room, which light do you turn on? Decorators and Interior Designers also love having one decorative switch/keypad instead of 6 switches side by side.
There are other benefits to lighting control, but I covered the more popular ones above.
LiteTouch began to face more competition in the small slice of the pie that they already had
Unfortunately, the market began to change, especially with the onslaught of different options. Vantage, Crestron, Control4, and Lutron started to increase their offerings as well as other companies. LiteTouch was sold to Savant in early 2012, originally to fill a void for Savant in their much-needed lighting control division, however, Savant soon realized that they had inherited a large base of systems that needed ongoing support/customer service as well as a tremendous number of SKUs to support from the past 30 + years of installations. Savant soon thereafter discontinued a large number of options and within three years of purchasing LiteTouch (2015) decided to abandon the entire program leaving thousands of commercial and residential clients without a manufacturer to support them. Many dealers and customers began to scramble to try and find parts to support their aging systems.
LiteTouch acquired by Savant:
http://www.cepro.com/article/savant_acquires_LiteTouch_home_automation_meets_lighting_control/
Savant Kills LiteTouch:
So you have a LiteTouch system and you are having some issues?
Having serviced various types of lighting control systems, there are several consumable parts that I would consider having in stock.
The first and probably the easiest part to replace is the fuse.
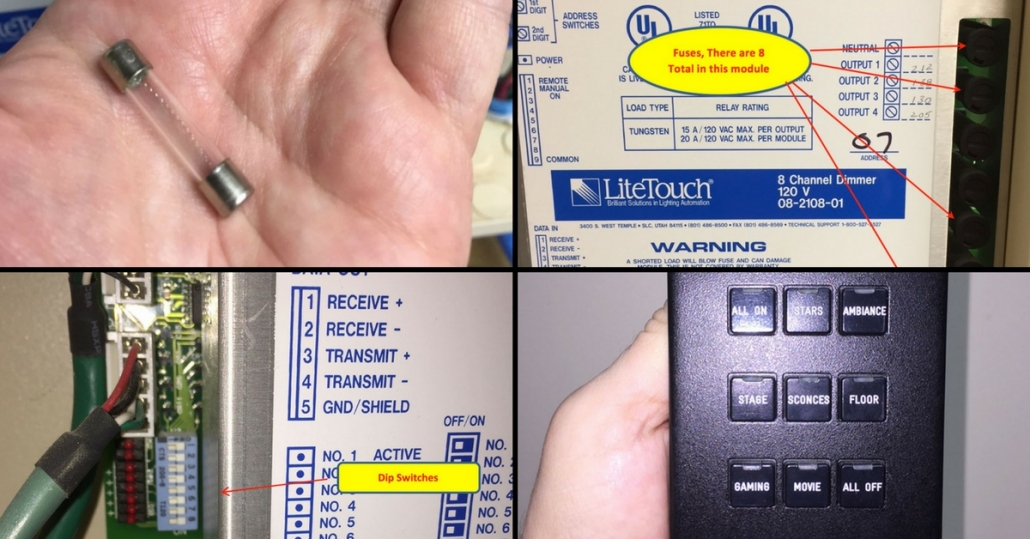
How to Replace the LiteTouch Fuse
The lighting control modules utilize one fuse for each switch leg in the enclosure. If you find one of your switches no longer working a fixture, good chance it could be the fuse.
First, you would want to manually flip the dip switch for the switch leg that corresponds to where the feed is wired to the module. By manually switching this little switch (you will need a very tiny flathead screwdriver). Once you flip the switch, if the light comes on and stays on, then the fuse and module would be ok, but most likely it’s the programming. (Another day on that topic).
If the light does not come on, it’s either the module or the fuse, so it’s best to have some spare fuses around to see if it’s an easy fix. Replacing the fuse requires a small flat head screwdriver and you would insert and twist until the fuse holder pops out slightly and then you can remove with your hand, swap the fuse and replace the fuse, push back in and turn again with the screwdriver slightly until it locks in place. ALWAYS make sure the current to that switch leg is off, meaning no power is being fed to that circuit.
See Diagram #1 below for Fuse Location
The 8 channel Relay Module uses a 12 Amp fuse (Old Part # 3613-012
The 8 channel Dimmer Module uses a 15 Amp fuse (Old Part # 3613-020)
Once you have the new fuse inserted, test by flipping the corresponding dip switch, see diagram #2 below.
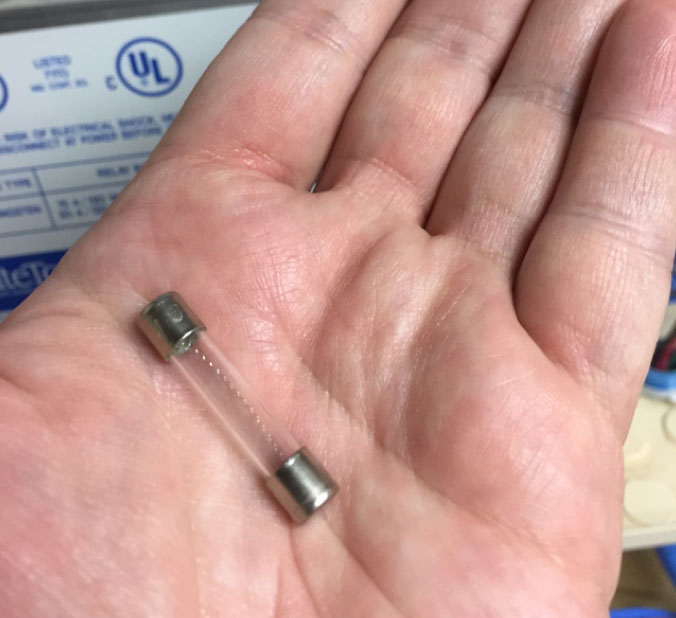
Example of LiteTouch fuse
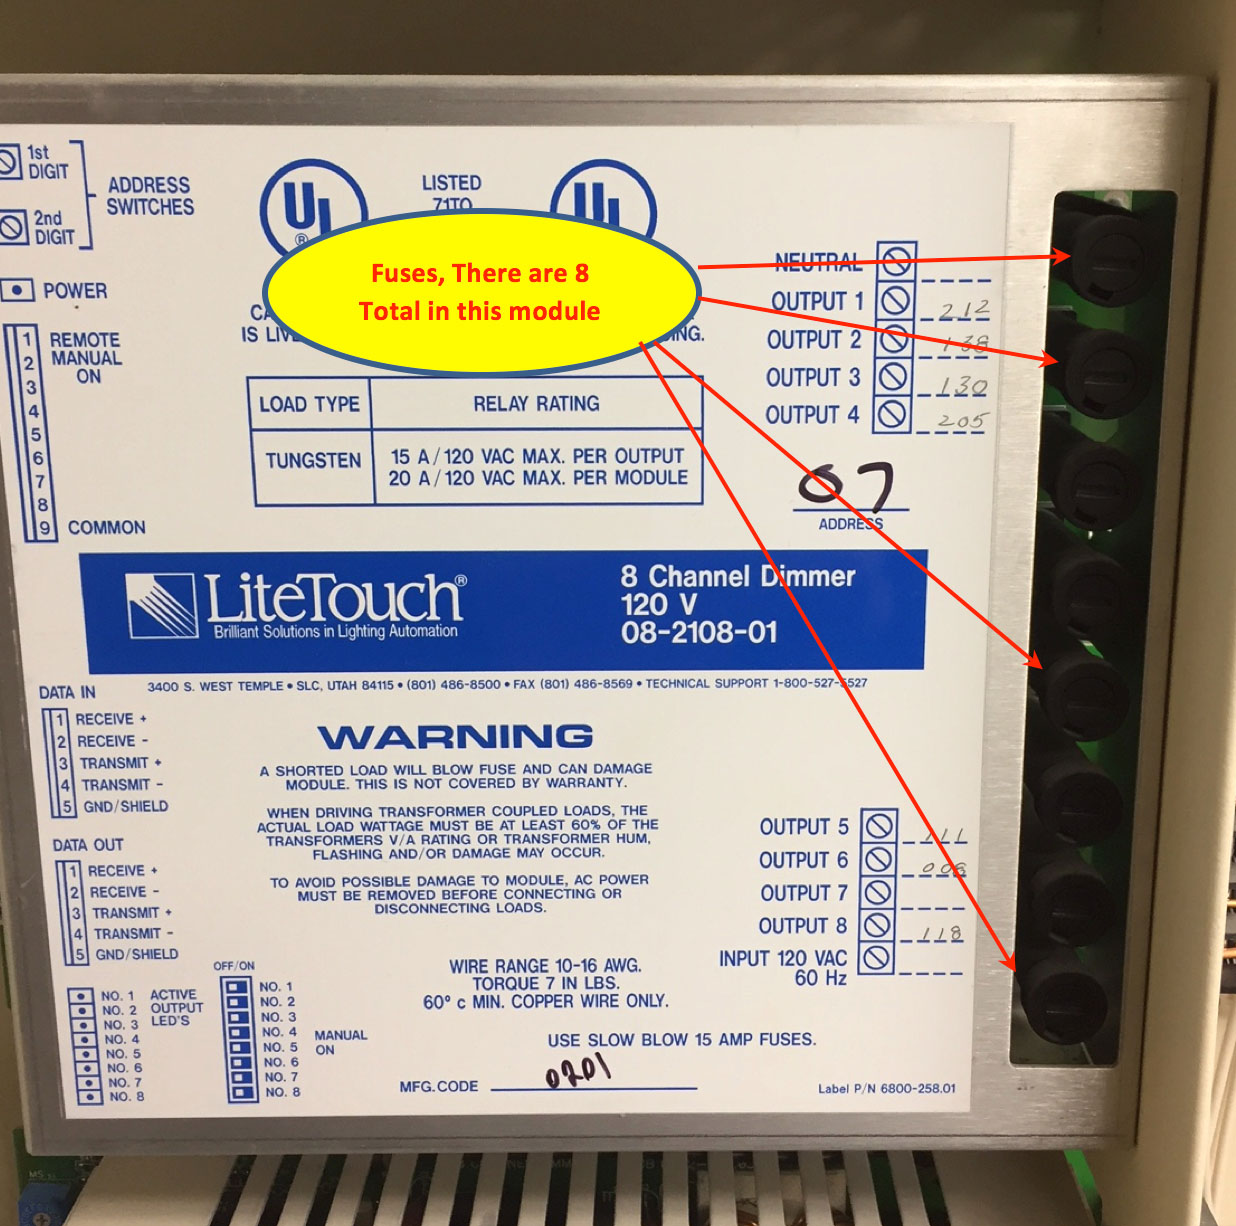
Diagram 1 fuse location
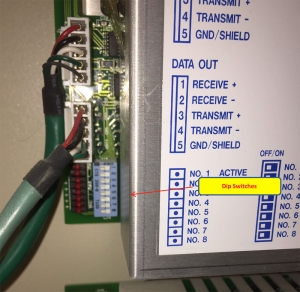
LiteTouch Dip Switches Diagram
So, the simplest repair you can do yourself is checking to see if it’s the Fuse or the module or programming. To recap.
- If the Dip Switch works and turns the light on and off manually, then the fuse is ok, module is ok, but you most likely will have an issue with the actual keypad or in programming. (another discussion)
- If the Dip Switch doesn’t work, then the problem is either with the fuse or the module, and changing the fuse will help test this quickly. If you don’t have time to get another fuse, you can always take a fuse from another circuit; again, remember to kill the power to these circuits at the breaker before inserting and removing fuses. If you find the fuse works then the module is good and you just repaired your LiteTouch system, congratulations! (Don’t forget to make sure you replace the other circuit with a new fuse as well)
- If the Fuse didn’t fix the issue, then unfortunately you either had another bad fuse (I always double-check), or it’s the module. Modules are no longer being repaired so you would have to find one on the black market, EBAY, there are some usually there for sale. If you can’t find the exact model, you may be able to exchange a 4 channel dimmer module that went bad for an 8 channel dimmer, they occupy the same space and you would only use 4 of the dimmer modules’ connections. One note, if the other switches are still functioning on the module but you only have one bad switch, sometimes, you can move that switch leg to an open location in another module. This would require an electrician as its line voltage you are now playing with, again a topic for another day. In all of my years of installing and specifying, we usually have some spare locations on modules for just in case, when a client decides to add more switches to the control system, they have capacity available, this also works for bad modules, so hoping you may have some spare locations.
How to Fix a Keypad Button that Sticks or Isn’t Working
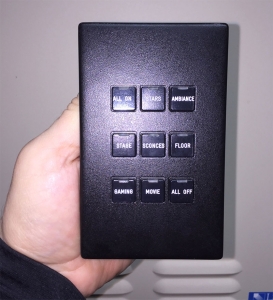
LiteTouch Keypad
With regard to troubleshooting other components, the second most common service request we find is the actual keypad button is sticking or no longer works, but the light does work when you manually flip the dip switch in the enclosure.
So how do you repair the keypad? The actual keypad comes off the wall, the faceplate is magnetic, just need something small to pry it off the magnet and the faceplate should come right off.
Once you remove the faceplate, you have 2 small Philips screws to remove, be careful, do not lift anything off, you will need to flip the black cover plate that is holding the engraved buttons, so they don’t all fallout.
On the older keypads, you will probably see a little piece of cellophane laying inside or loose that holds a small thin piece of metal (dome) with a little dimple in it. This little dome is what depresses to activate the button and the little piece of cellophane used to be the tape that held the button in place. The newer designs circa 2008-2010 replaced this older design. A small piece of scotch tape can usually do the trick, but it will take time to cut the tape and get the small piece of metal back in place. Be happy to help someone over the phone if they need some direction on this since I don’t have a picture readily available.
As you can see, the keypads and the fuses are repairable, however the modules, the main controller (CCU), and the required programming and wiring in place will not be so easy and you really should involve a trained individual to assist with these repairs, even if they are possible.
If you need another resource, try to reach Elwin Jensen for repairs of modules, at elwinjensen@comcast.net, he may be able to help and his website is here, he is a good resource and was also very supportive to our dealership when he worked for Litetouch. http://www.thelitetouchdoc.com
This brings me to my next question:
Should I even waste my time repairing this system?
The short answer is, if it’s a fuse or a keypad, it’s a simple fix (simple in layman terms). If it’s a module, a little bit more complicated but still doable. If it’s the programming or CCU, then you will need to involve a professional to assist. You will be spending a considerable amount of money since the parts are no longer being made and the programmers and CCUs are in limited supply online.
If you are staying put, then the short answer is how much do you want to invest in repairing the system and for some, that may be the only answer. If you are selling the home or upgrading the home, then the correct path would be to upgrade the entire system. We have had a lot of success using Lutron and they have been around the longest and I am confident that they will be around for a lot longer, which is now something you need to consider. Vantage, Control 4, and some others are fairly new players in the lighting control industry and I would be hesitant to go through the same situation 2 times.
How much will it cost to replace the entire system?
Here is a link to an article below by Julie Jacobson from CEPro
http://www.cepro.com/article/options_replacing_savants_LiteTouch_system_how_much_will_it_cost
I haven’t seen any systems in homes of 2500 sq feet and I think the cost to do the upgrades could be more than double what she proposed. Upgrading a LiteTouch System will also require you to be down for several days depending upon how big the system is. So you have to factor in not having any light in the home and possibly temp lighting for the contractor to work with. Once you upgrade, you’ll be happy to know there’s a cool APP for almost any system you upgrade to and the flexibility and control of the lighting have been improved as well.
Final Thoughts on LiteTouch Repair Services & Replacement Options
Some systems you just can’t repair. Many of the older series modules have non-replaceable fuses, which means you would have to disassemble the module to replace the fuse, doable, but not for the novice. Most of the newer systems, say 2000 and after, had field serviceable fuses. Again keypads are repairable, and it really depends on what is installed and what you can steal from Peter to pay Paul.